

How To Install Toolbox In Solidworks
Assigning custom properties to toolbox components including material
Users can add custom properties to any toolbox component, this can allow companies to track data that's unique to their organization, this could include manufacturer, ordering information, or component cost. To add these data fields, create a custom property for each piece of information that the user would be interested in tracking. These are not enabled by default and will have to enabled for each piece of hardware it affects.
Abstract
The goal of this document is to explain the different features and functionality available within toolbox and how to configure these features.
What is the Toolbox Library?
The Toolbox is a collection of several powerful tools built into SolidWorks; it can increase productivity and decrease the time required to complete a design. The Toolbox contains a vast library of standard hardware components that can easily be dropped into a design at any point. These components can be configured to easily populate Bills of Material with part numbers descriptions or any other custom information that needs to be easily displayed to the user.
Setting up and using a toolbox can be broken into several distinct steps these are listed below
Note: When utilizing PDM Standard or PDM Professional, the specific steps will be colored in blue.
- Determining the location Toolbox, stored on a network or locally.
- Installation / Upgrade
- Admin access and settings
- Component Visibility
- Custom properties including any available materials
- Custom components
PDM standard and PDM professional are both built to manage Solidworks toolbox and its files. It's encouraged to install the toolbox in the PDM environment and setup the vault to manage the files within Toolbox. Details on how to this can be found in "Migrating Toolbox files to a network location or PDM Vault."
Toolbox Installation
The Solidworks toolbox is installed with every professional or premium version of Solidworks. There are 2 different parts of the installation that deal with the toolbox.
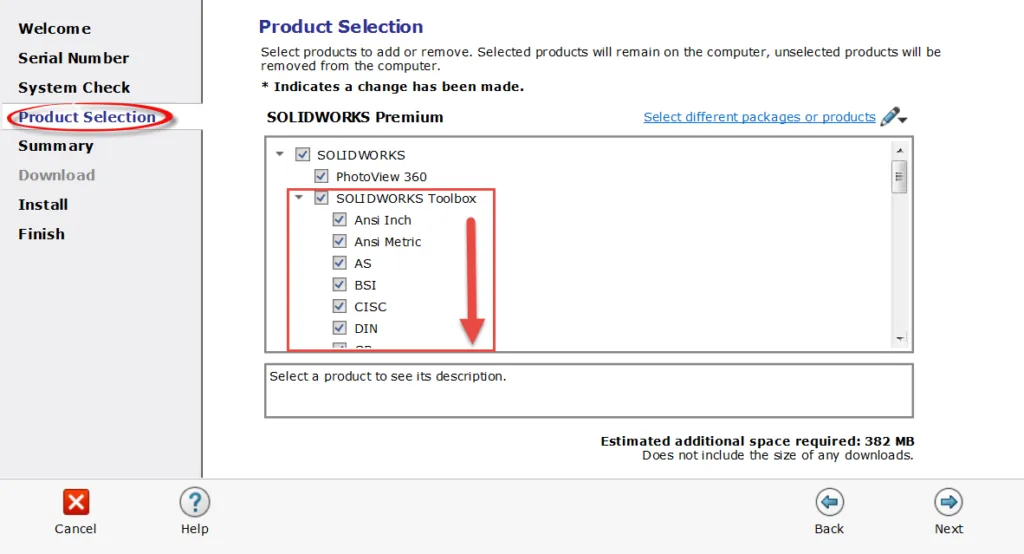
First is encountered in the Product Selection tab, in this window available standards can be excluded from the installation. By default most users will leave all standards selected.
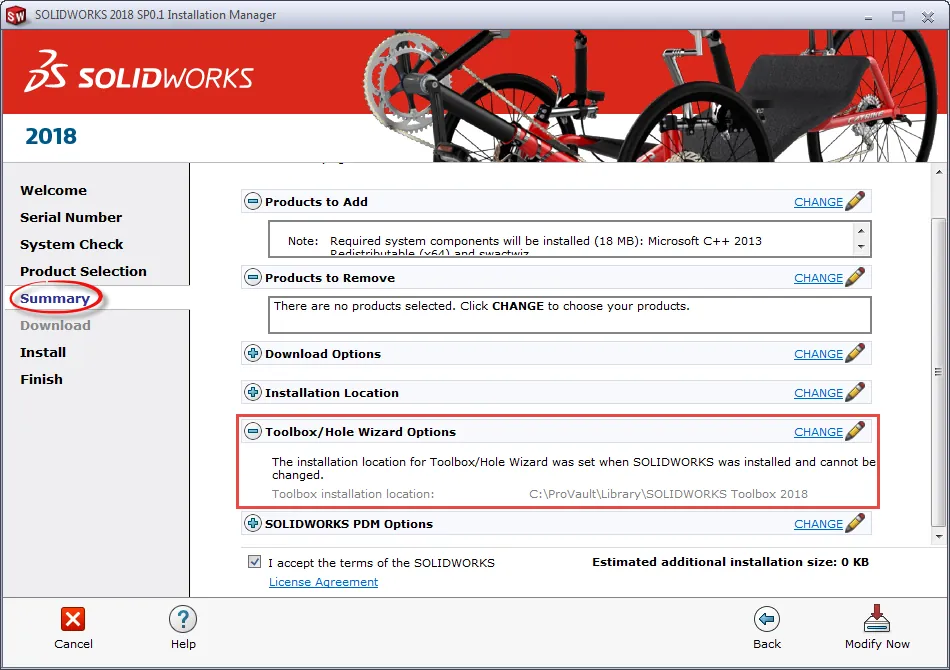
The second part of the installation that pertains to toolbox is the file location and file name of the toolbox. This is on the "Summary" tab in the installation window. By default the toolbox is saved to the C:\ drive and it's named "Solidworks Data." Both the location and name of the toolbox folder can be changed by simply selecting change. In the window that follows the user can select "browse" to change location and type in a folder name.
Once the installation of Solidworks is finished it will include the installation of the Solidworks toolbox.
Migrating Toolbox files to a network location or PDM Vault
There is one major deciding factor to determine if moving the toolbox to a network location would be advantageous. If the intent is to customize the toolbox with part numbers, custom properties, or add hardware restrictions a network based toolbox would likely be beneficial. There are several infrastructure restrictions to having a network based toolbox. The first is all users will need to have constant access to a network location. This location will also need to have low latency. Any slowdown in data over the network will negatively affect program performance during operations that involve toolbox components.
The first step to migrate the toolbox to a network location or a PDM environment is to locate the toolbox directory that needs to be replicated on all of the user's machines. The toolbox by default is installed on the computers C:\ drive typically C:\SOLIDWORKS data. If there are multiple instances of the toolbox the most recent version will have the highest number. This folder along with all of its contents can be copied onto the network drive or PDM vault.

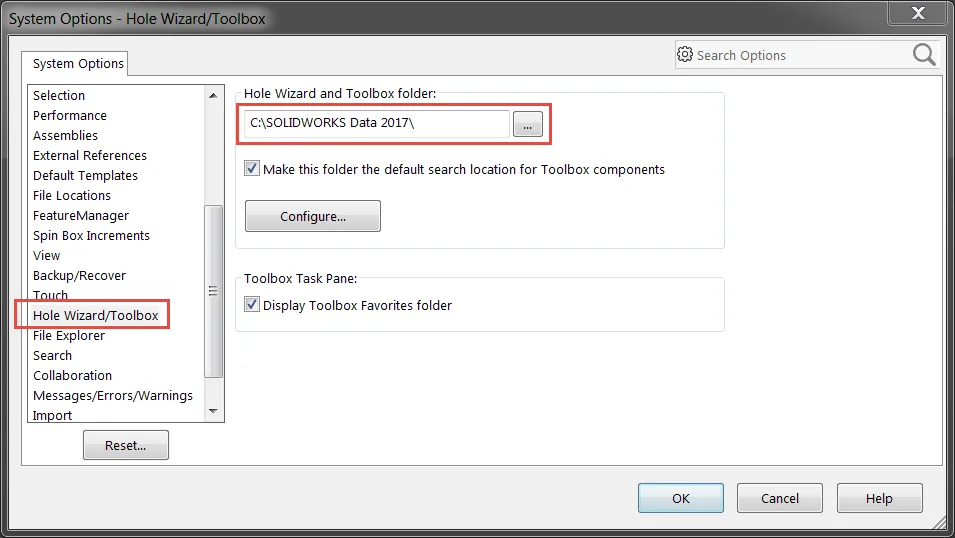
The next step is to configure Solidworks to use the new location of the toolbox. To edit this navigate to Tools > Options > (tab) system options > Hole Wizard/ Toolbox.
From here the file location can be changed from the default location on the "C:" drive to the network location. The address can be manually typed or browsed to by selecting the "…". Once this location has been changed Solidworks will look to this location for toolbox components.
Note: If using PDM Standard or PDM Professional there are additional steps to finish setting up the toolbox to work with PDM.
After adding the toolbox to the vault, check in the entire file structure. This can be done by selecting root folder "SOLIDWORKS Data" and selecting "Check in". This process could take some time since the toolbox contains a large number of files.

Once the toolbox has been checked in the PDM system has to be configured to manage toolbox components. To configure these settings, open the administration tool and select toolbox. Select Manage Solidworks toolbox in the vault and define the path to the root of the toolbox.
Example: {C:\< Vault-Name>\Solidworks Data}
Once this has been completed see the PDM information in the section "Toolbox File Type" for information on how to configure settings in the toolbox that will optimize it for use in a PDM environment.
Manually upgrading toolbox
When upgrading Solidworks, it is recommended to use the installer to upgrade the toolbox automatically.
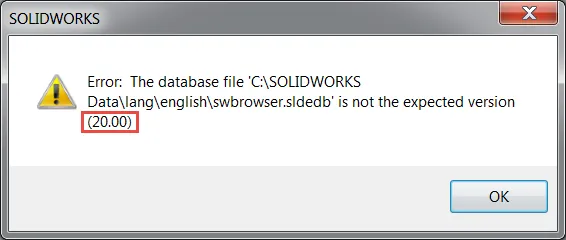
If the automatic upgrade is overlooked or unable to be processed it will result in a version error. This message will not only specify it's the wrong version but it will specify the version required. The required version will be in parenthesis at the end of the error message. The year is not referenced in the version but the versions are sequential. Version 20 is 2017 so version 21 will be 2018 and so on.
Before upgrading the toolbox, it is recommended that a back-up is made. This backup doesn't have to be complex simply making a copy of the toolbox folder and moving that copy to a safe location will be sufficient. A suggestion is to right click on the folder and choose Send to > zip. This will create a zip copy of the folder in its current state. PDM users this step isn't required since previous versions of the database are indexed in the vault and can be rolled back.
Now need to navigate to:
{C:\Program Files\Solidworks Corp\SOLIDWORKS\toolbox\data utilities\} (Solidworks Corp could be named slightly different, it could have numbers at the end of corp, if so choose the largest number. If the folder was renamed during installation, then it will show by the specified name.)
In this folder find and launch the application: "Update browser database".
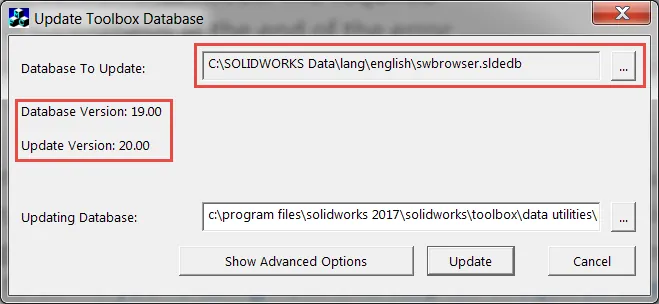
Once in the utility some information will be provided, and some will need to be selected. First, it will display both the directory to the toolbox and its version. This is loaded from Solidworks, if this window is blank simply navigate to the database file "swbrowser.sldedb" it exists at \lang\english.
The application will automatically fill out the updating database information. It will reference the folder used to launch the updater from, since this folder contains the updating information.
Before using the updater check out the database file swbrowser.sldedb, in the case a file named swbrowser.sldedbold is also found in the directory it will need to be checked out as well.
Run the update utility it'll take several minutes. Once this is complete the toolbox will be updated. Test functionality by launching the toolbox inside of Solidworks.
After the update check-in the database and have users get latest so the changes are reflected for all users.
Toolbox Setup
The toolbox can populate bills of material, contain materials, and automatically be added to assemblies. These functions, though powerful, must be configured up by the user(s). Ideally these would be set up before rollout. As compared to having and incremental implementation.
Permissions
Toolbox contains its own permission structure to limit individual user's ability to edit specific parameters linked to the toolbox. To activate the toolbox permissions simply create a password and security phrase to lock the toolbox. After this has been created all users wishing to change locked aspects will need the administration code to do so. This limits the users from being able to make changes with unintended consequences.
Each setting has a specific purpose.
- Content: This is what pieces of hardware is available for use in the toolbox add-in within Solidworks.
- Custom properties: These are set by the user, these could include vendor, material, or various other trackable hardware information.
- Adding: This restricts users from adding custom Solidworks parts to the toolbox database.
- Part Numbers: This is an included property in each component, this is very similar to its custom property counterpart.
- Editing Configuration names: These are the unique names generated by the program when the hardware is initialized for the first time.
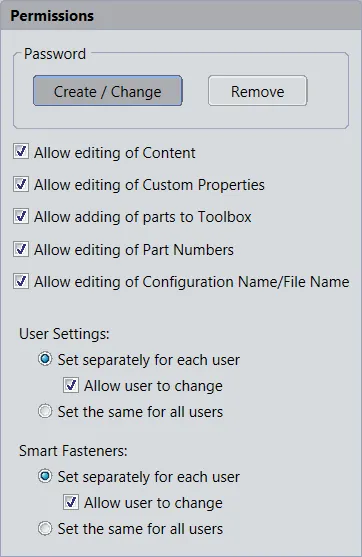
The user settings only control the settings for the toolbox settings program. These options do not pertain to any settings contained within Solidworks.
Smart fasteners settings control what hardware files from the toolbox are used when a user activates the smart fastener feature within Solidworks. This setting will control if these settings will be companywide or if they can be configured by individual users.
Toolbox settings
The toolbox has a variety of settings that require configuration for the best utilization of the toolbox program. These control how the toolbox functions internally along with what data will be displayed to the user while they utilize the toolbox inside of solidworks. To edit the settings associated with toolbox launch the toolbox settings program ( or choose configure toolbox inside of Solidworks) and select option 3 "Define user settings".
The first major setting is whether toolbox will create parts or configurations when hardware of a new configuration is used. This is an internal setting and will not change how the user interacts with the toolbox utility.
Create configurations will add a new configuration to an existing toolbox file each time a new toolbox size is used. This will lead to very large files with a large number of configurations. This setting can see reduced performance in large assemblies.
Create Parts will create a library of files each file representing a single configuration of a toolbox file with a single specific size. This setting will create a large volume of part files but each of these will have a very small file size.
Create Parts on Ctrl-Drag is a hybrid of the two versions previously mentioned, it will act like create configurations except for when users press CTRL while dragging components onto the screen.
If either method that causes the creation of parts is selected. A folder location will need to be defined to have generated part files deposited into. Solidworks has included a blank directory into the Solidworks Data folder named "Copied parts", this or any other directory can be defined. It's recommended to use a directory inside of the toolbox though so that when backups are taken they include all generated toolbox files.
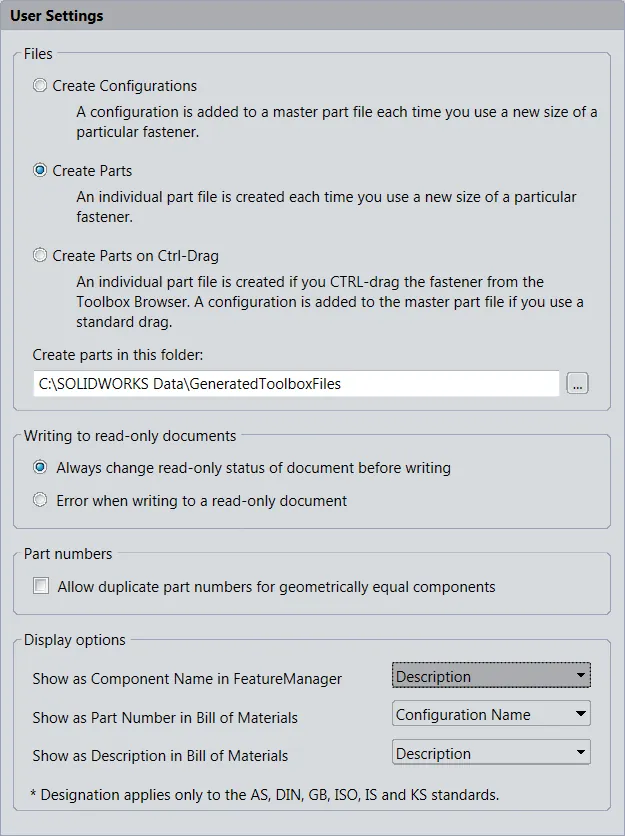
Writing to read-only documents this setting is typically left in its default state, this controls the read-only state of the part files in toolbox. This just gives the program the right to change the read-only flag. If either file setting that has create configurations active this setting should be set to allowing toolbox to change read-only status.
Part numbers, allowing the same part number for geometrically equal components can be useful when a hardware component has several custom properties that generate different configurations even though the component will have identical geometry. This does not allow the user to enter the same part number for non-similar components
Display options control what information about the hardware is visible to the user and in what context. The variable used is not limited to the standard description, comment & part number. It can be any custom toolbox property defined by the user.
Standard Component Properties
All hardware in the toolbox contains standard properties, the individual properties will vary based on the type of component selected. These properties include all the basic construction data about these pieces of hardware. To view or edit the standard properties choose a component inside of the toolbox and the user will be presented by a window similar to the one below. Below is an explanation of the different properties and what they're used for.
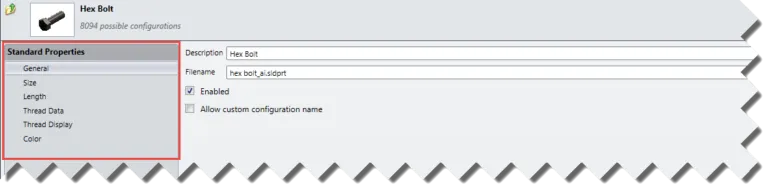
General: The general properties is displayed in the image below it contains the description of the component in the toolbox (Note: this is not the same as description used in BOM's within Solidworks). It will also have the Solidworks part file that contains the geometry for this part file along with a couple settings. The enabled setting allows or restricts users the ability to use this component within Solidworks. Checking "Allow custom configuration name" will unlock the configuration name column lower on this page allowing changes to be made to the configuration names of components.
Size/ Length: The size and length settings control the ability to use particular sizes or lengths of this particular piece of hardware. This allows the toolbox to be edited to match company standards by disabling and or adding sizes that match what hardware is available to the user(s). In this window it's also possible to add custom sizes and lengths to the toolbox hardware if there exists a particular size that's not included by default inside the toolbox.
How To Install Toolbox In Solidworks
Source: https://www.goengineer.com/blog/solidworks-toolbox-library-setup-utilization
Posted by: perrinandill.blogspot.com
0 Response to "How To Install Toolbox In Solidworks"
Post a Comment